Sunday, January 31, 2010

Creating a Stripe Part 2

Since this is a commission I plan to dye one piece and then have the client approve the results. Then dye the other 3 pieces to match. Keeping the results consistent through 2 dye batches will be easiest if I use very specific formulas.

Procion MX dyes work like epoxy glue. There are two separate parts that need to be mixed together for the chemical reaction to occur. Apart they have a shelf life of a few days or even weeks depending on other factors like the surrounding temperature and how precise you need the colors to be. Once they are mixed together the chemical reaction occurs and if they aren't applied to fabric they will chemically bond to the water in a process called hydrolyzation, losing strength in an hour or so.

Using unactivated fabric and activating the solution only as I need it is the easiest way to work on this project. For this I will mix a dye "paste" and an activator solution mixing them together only when I am ready to dye the fabric. In addition I will be using a third mix of thickening solution (sodium alginate) to change the consistancy of the dye and give me more control during the application.

Mixing the 3 Parts

Part 1 Dye Paste

I keep recipes of dye mixes/colors I like so I can reproduce them.
The formula I use is: consist of X grams ____ dye powder > X cups H2O. (who knew that the Algebra I despised would actually come in handy?) nice and simple. To increase the quantity of a recipe just multiply both sides of the equasion by the same number
In this case the dark Navy will be 20 grams Navy powder > 1 cup H2o
and the light navy will be 2.2 grams Navy powder > 1 cup H2O
both will start from the same dye paste
To make a paste I mix the full grams for a recipe into 1/2 the needed H2O
So here I will be putting 60 grams of Navy into 1.5 cup H2O
(use warm water this dissolves the dye better)

Part 2 Activator
add 1 tsp of activator per 1 cup H2O and mix well to dissolve it.
I made 6 cups
Part 3 Thickener
Thickener is sodium alginate or ground seaweed. It is a powder that is added to water and basically creates goo. Depending on how much powder is added to the water you can vary the consistency from cream-like to honey-like to toothpaste-like
I dissolve the thickener in warm water a day or so ahead of time mixing it 3 or 4 times as it sits.
It has a tendency to be lumpy when first mixed but smooths out with time. It lasts indefinitely in solution when stored in a closed container in a cool place. I mix by eye making it very thick and adding water to get the consistency to where I want it.

for this project I made some thing about the consistency of cold honey.
These 3 parts are kept separate until it is time to dye. when everything is ready to go then I turn into the mad scientist!
The final step is to mix the parts together to make 2 colors of dye one Dark with thickener, and one light without it.

Dark Navy:
Using a measuring cup (1 Cup)
fill to 1/3 cup mark with thickener
fill to 1/2 cup mark with activator
fill to 1 cup mark with dye paste
stir til mixed

Light Navy
mix together
1/2 cup dye paste
3 1/2 cups activator
stir til mixed

The actual dyeing of the stripe is pretty simple
I dipped both ends of the rolled fabric into the light Navy to a depth of about 1/2 inch
then dipped both ends into the dark Navy to a depth of about 1/4 inch
Because the light is unthickened it will travel further into the fabric, the dark will remain where it is applied more or less...
and here is the result

Thursday, January 28, 2010

Creating a Stripe Part 1

Thought it would be fun to do a process post just to change things up a little.
I have a commission to make four 36" by 45" pieces of cotton Shibori striped at 6 to 8 inch intervals.
Shibori tends to be a little surprising so in order to keep the four pieces as similar as possible I will make the folds and dye application very consistant.
To create the Stripe
For this project I will be activating the dyes rather than the fabric so the first step is to prewash the fabric and then cut it to length and press it flat.
I then marked it at the width I decided would work best. I chose 7.25 inches, it is within the range asked for and should leave me a little extra room for the dye to soak into the fabric without closing up the stripes too much.
Next the fabric was pressed into pleats
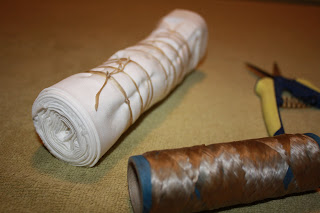
Then it was rolled into a log. Rolling the fabric creates small wrinkles and distortions that will be at a right angle to the stripe. This will make the line fluctuate slightly, its a bit more visually interesting than a straight line. Nothing against straight lines you understand, but shibori probably isn't the best way to achieve them.
Finally I bound the logs, and wrapped them in plastic wrap that is a little shorter than the length of the logs. This will protect the white areas from fingerprints, smudges and splashes. I tied the Plastic down too, creating another resist to stop the dye from running and giving me a visual aid to judge the dye process.

Tomorrow I will show the dye process and some results...

Wednesday, January 27, 2010

What to do with it...

Thought I'd take a little break from listing tonight and post a little gallery of some projects made from my fabrics. Some of these are a few years old others are recent...

This bag was sewn by my mom, she has mad sewing skills, puts me to shame every time...
here she combined my shibori with some commercial fabrics she had in her stash and voila! I got a new camera bag! Thanks mom!

I kept a little of this piece for myself, I thought the pattern was pretty successful
.
This is what I made from it, a large candle holder.
I used the fabric to make a sleeve that fits around the glass vase/holder.
It looks pretty in the daytime.
And it glows at night

Tuesday, January 26, 2010

Turquoise Batch

This is the second batch I did over the past weekend.

All in turquoise and aqua on pimatex cotton

all listed at ETSY this evening.
#104: 22" by 18"
#105: 22" by 18"
#103: 23" by 23"
#102: 33" by 21.5"
#101: 22" by 23"

Monday, January 25, 2010

A Blustery Day


A storm blew in today. Windy warm and wet my personal definition of a blustery day.

I expect the change of weather to whisk away some of the cold rigid thinking that I've been trapped in lately. Storms take me out of myself and shake me up, make me look at things from a different perspective.

Last week I finally decided to dye up some linen that I've had for... yeesh I dunno, a year maybe?

I decided that it would make nice table runners and I could make 3 of them from the piece I had.

I wanted to do one in classic indigo blue and I figured as long as I was at it I would dye some cotton up too. I don't have any particular project in mind for the cotton so I decided to put it up for sale on ETSY
I kept a small piece of the one at the top for something special
these are the other pieces I posted


Wednesday, January 20, 2010

Holding Breath

I got my rubber gloves on tonight and dyed up 2 batches of itajime. Both batches included some pieces of linen that I had been saving for the right project. I am kind of biting my nails hoping it came out well as I want to make some table runners out of it.

I haven't dyed much linen before but I love the fabric's smooth crispness. I have a fantasy of someday having linen sheets.

I am working on some projects with a particular goal in mind but I'm not quite ready to talk about it yet. Sometimes when a goal is important to me I get reluctant to discuss it. I just can't risk the potential negativity I might encounter (or imagine).
I have been pushing myself to get up before work and spend some time in the studio, and to finish some odd projects.
This is the paper quilt I started back in September, and no it isn't done but I'm willing to set it aside while I work on more important stuff right now.

Monday, January 18, 2010

Paper Love

I've been quiet lately, distracted and focused elsewhere...
I've mentioned before that I am a lover of animation, here are two recent pieces that grabbed and delighted me
Parkor and This is Where We Live
Both of these feature paper
I love paper art
I found both of them through this blog:
Lines and Colors
which is one of my must reads. A truly interesting look at artists from all over the world and throughout history. Just love it.